Sunday, August 12, 2012

Mad about Macs!

Since my husband bought me a new oven, I've been much more enthusiastic about baking... cakes, cookies, bars, and even brought me to venture to making roast chicken, pot roast, etc. But one thing that I've been dying to experiment was making macarons.

In the past 2 1/2 years that I've lived in Indonesia, I've tried making macarons several times prior to my new oven and 8 out of 10 came out disastrous. My old oven was small and has a mind on its own when it comes to temperature. Although my new oven is not a convection oven in which one can set and maintain temperature, it's been great! I did have to do a few test runs that resulted in failed macarons, but I finally got the right formula for my oven!

Since then, I've been in macaron madness for the past month!


I'm very happy to say that now I'm not afraid of making macarons anymore. In fact, it's such a joy watching the little feet develop in the oven.

Here's the macaron recipe that I used:
(adapted from Laduree Sucre)

68g almond powder
62g powdered sugar
50g egg whites
50g granulated sugar

Preheat oven to 350F. Sift almond powder and powdered sugar together and set aside. In a very clean bowl, whip the egg whites until foamy and then slowly add in the granulated sugar. If you want to add coloring, add it now. Add the almond mixture to the meringue all at once and fold the mixture using a spatula until the batter is shiny and has the consistency of lava. Pipe the batter on a silpat or parchment paper and leave to dry for about 20 minutes (depending on the humidity, the time will vary). Bake for about 15 minutes. Once done, remove from the oven and let it cool to room temperature before attempting to remove the macarons from the silpat or parchment.

For the filling, go wild! I've used ganache, buttercream, jams, peanut butter... whatever you feel like eating :)

Enjoy!

Monday, June 25, 2012

Cream Scones with PB&J

This weekend has been extremely wonderful... my bff is throwing a 61st birthday party for her dad and we've decided to make a dessert corner for the event. So for the whole day saturday and half of sunday, we spent making lots of goodies that made my house smells so delicious!

We made mango cream puffs, cheese chiffon cake, carrot cake, banana cupcakes, gingerbread cookies, chocolate chip cookies, and mixed berry tart. It's really fun seeing the desserts being displayed out and guests came and try them. Unfortunately, we didn't really get to take pictures of them.

Continuing with the baking momentum, I made some cream scones this morning. I've always enjoyed reading Joe Pastry's blog because he not only provides recipes, he also writes about the process, the history, and tales behind the desserts. This cream scone recipe is from his website and it is goooooodddddd! The scones was moist and delicious with soft crumbs that absolutely melt in your mouth.


Cream Scones
adapted from Joe Pastry

280 g all-purpose flour
50 g sugar
2 teaspoons baking powder
pinch salt
80 g cold butter, cut into cubes
120 ml heavy cream
1 egg
1 1/2 teaspoons vanilla extract
1 egg mixed with 2 teaspoons milk for the glaze

Peanut butter
Blackberry preserve (or any jam of your preference)

Preheat the oven to 500F. In a large bowl, sift in the flour, sugar, baking powder and salt. Add the butter pieces and using a pastry cutter, cut in the butter until the mixture looks like corn meal. In another bowl combine the In a small bowl whisk together the cream, egg and vanilla. Combine the wet and dry ingredients and gently fold them together.

Turn the dough out onto a lightly floured board and pat it down until it’s about 1.5 cm thick. Using a round biscuit cutter, cut the dough into rounds and place on a lightly greased baking sheet. Push together the scraps, pat them down and repeat the process until all the dough is used.
Whisk the egg and milk together, and brush it onto the tops of the scones. Bake 8-10 minutes until they’re lightly browned on top.

Friday, June 22, 2012

Chocolate Cupcake with Salted Butter Caramel Frosting

I haven't been able to sleep lately and this is very surprising for me (or anyone who knows me - because I sleep anywhere anytime). Although I feel tired in the morning as a result, I've been quite productive during those late sleepless nights. One of those result is this chocolate cupcake with salted butter caramel. It's a combination of 2 recipes from Sprinkle Bakes' blog - which is full of amazing recipes and inspirations.

I used her moist chocolate cupcake recipes (here), in which she promises that the results will be pretty rounded tops and super moist crumbs, and her salted butter caramel buttercream recipe (here).

True enough, the recipes yielded these moist chocolate cupcakes with perfectly rounded tops! :) I was so happy with the results. The frosting however, was too sweet for my preference. I think the next time I make a caramel frosting I would use an IMBC base instead of a traditional american buttercream.

Anyhow... it's now time for me to drink my tea and eat another one of these yummy cupcake :)

Thursday, June 21, 2012

Raspberry Mascarpone Tart

It's been almost 2 and a half years living in Indonesia, a little more than 2 years of blissful marriage, and almost one and a half years of neglecting my blog. For that, I apologize. It's not that I haven't been baking... I've been baking quite a lot actually. It's actually more on the fact that I don't have time anymore to take pictures and writing out the recipes. But I'm going to try to do better. Starting with this pretty tart I made last night.


Raspberry Mascarpone Tart
adapted from Sarabeth's Bakery and Baking at Home

1 fully baked and cooled tart shell (I used an 8-in square tart shell)
1/2 cup mascarpone cheese, at room temp
1/4 cup orange flower honey
1/4 cup fresh lemon juice
1 cup heavy cream
1-2 cups fresh raspberries
Powdered sugar, for garnish

In a bowl, whisk until smooth the mascarpone cheese, honey, and lemon juice. Set aside..

In a separate bowl, whisk the heavy cream until it reaches stiff peaks. Fold the the whipped cream into the mascarpone mixture in 3 additions. Pour the cream into the cooled pastry shell and evenly distribute using an offset spatula. Cover the tart loosely with cling wrap and refrigerate for about 15 minutes.

Garnish the tart with fresh raspberries and lightly dust the raspberries with powdered sugar to create the snow effect.

Enjoy!

Tuesday, January 18, 2011

Chocolate Strawberry Tart

Been fascinated with tart shells these days - pate Sucre or sweet pastry crust... yum!


Baking things whose batter require refrigeration has been a challenge for me in Jakarta. The hot and humid weather makes it really challenging to keep the dough chilled while working on it. Thank goodness for air conditioning that helps the process. :) I still find myself going back and forth to the fridge to re-chill the dough during my rolling process. This is part of my reason for my fear of attempting to make puff pastry dough :p

Since I was in the baking mood and had quite a bit of time, I decided that one fine afternoon to make chocolate strawberry tart. I used the recipe from my recently purchased book, the art and soul of baking, and I really like the hint of vanilla in the crust.

6 1/4oz all purpose flour
1 3/4oz granulated sugar
1/4 tsp salt
4oz cold unsalted butter, cut into small cubes
2 large egg yolks
2 tsp pure vanilla extract
1-3 tsp cold water

Using a food processor, put the flour, sugar, and salt into the bowl and pulse several times to combine. Add the cut butter and pulse again 6-8 times until the butter becomes pea-sized crumbles. In a small bowl, mix the egg yolks and the vanilla and stir to combine. Slowly drizzle in the butter mixture while pulsing the food processor until the dough forms small clumps. Test the dough by pressing a handful of the dough - they should stick together. If the crumble and fall apart, add 1 tsp of water and pulse again. Repeat if necessary.

Turn the dough to a lightly floured surface and knead a few times to bring the dough together. Shape the dough into a disc and plastic wrap it before storing in the fridge.

Now I use a regular 1:1 ratio for the chocolate ganache and lined the tarts with my homemade strawberry jam before pouring in the ganache. :)

Itadakimas! (so the Japanese say)

Wednesday, December 1, 2010

Green Tea Dacquoise

Hello again! I've started this post in December but i've only been able to write up today :p I'm looonnggg overdue on this one. Lately I've been on the baking mood - making cakes, cookies, and verrines - and it has been making me more cheerful and energetic.

These little green tea delights are quite adorable and taste real yummy to those green tea fans. The taste of the green tea is really strong and this little cookies are not too sweet as well. The recipe that I used for these are taken from Okashi, a baking book that I bought in Singapore last year. This book has a lot of asian inspired western desserts and I just love reading the book. This will be the first time I bake anything out of this book though. :p If you talk to my husband, you'll soon discover that I loooovvee reading baking books but I don't really use the recipes in the books to bake my cakes. I usually use my own version of mix and match.

Here's the recipe:

180g ground almonds
80g icing sugar
10g green tea powder
40g superfine sugar
2g eggwhite powder (i didn't use this)
200g egg whites

Preheat oven to 180C and line baking sheets with parchment paper. Sift together the almonds, icing sugar, and green tea powder and set aside. Make a meringue using the superfine sugar and egg whites until it's glossy and reaches stiff peaks. Fold in the sifted dry ingredients into the batter. Use round piping tip to pipe out small discs. Dust with icing sugar and then bake for about 15-20 minutes or until the dacquoise rises up and the surface becomes dry.

For the green tea cream,

100g unsalted butter
35g egg whites
35g icing sugar
5g green tea powder

Make meringue out of the icing sugar and egg whites until glossy and reaches stiff peaks. Beat butter in another bowl until softened and smooth. Add the meringue to the butter and mix until well incorporated. Add the green tea powder to the buttercream and mix well.

I also loooveee the green tea buttercream. It's really smooth and the green tea flavor is really strong as well. I chill these little cookies in the fridge for a day before serving for better flavors.

Oh! One more thing... do you remember two bites? Well, I've just recently started two bites here in Jakarta. I'm slowly starting to take in cake orders as well as mini desserts for dessert tables and small parties. It's still a home based business among friends but I'm glad that now I can start channelling all these baked goods that I'll be producing in my kitchen. :) It's always a joy to have others share the taste of the cakes and cookies and desserts that I make. I get that warm fuzzy feelings and I love it!


Okay... back to work now ^_^

White Butter Cupcake with Lemon Mascarpone Cream

I've been missing for a long time from this blog and I'm sorry for it. I wish I had more time to write and upload pictures and recipes to this site. It's true that the internet connection in Jakarta is a LOT slower than in the States, but that is not enough reason for abandonment. :p

Anyways, I just got this pretty cucpcake tower as a souvenier from a 50th birthday party and I love it? It's really quite a romantic and elegant design. Because of this cupcake tower, I had to make cupcakes just to take pictures of it. And since my sur la table's baking book has been waiting for me to give it a try, I made these white butter cupcakes with lemon mascarpone frosting. I made this cake into a little "diet" version with lite sour cream instead.

White Butter Cupcakes:
6oz unsalted butter, softened
5 1/4oz sugar
4 egg whites (approx. 140g)
1 tbs pure vanilla extract
7oz sifted cake flour
3/4 tsp baking soda
1/4 tsp salt
3oz sour cream (or light sour cream)

Preheat the oven to 350F and line the cupcake pans with liners.

Cream the butter and sugar together with a mixer until light and fluffy, about 5 minutes. Beat the egg whites and vanilla extract lightly to blend and then add to the butter mixture a little at a time. Sift the flour, baking soda, and salt together. Add the dry ingredients and the sour cream to the butter mixture alternately in addition.

Fill each cupcake hollow with the batter about 3/4 full and then bake for 15-20 minutes until firm to the touch and a toothpick inserted to the center comes out clean.


Lemon Mascarpone Frosting:

10oz heavy cream
1 1/2oz sugar
16oz mascarpone, at room temperature
1 1/2 tbs lemon juice

Combine all the ingredients in a bowl and whip until light and fluffy :) As easy as that!


I used my tulip cupcake liners this time :) I think the cupcakes turned out to be rather pretty. I send these away to my friends and I heard that they enjoyed it quite well :)

Friday, November 26, 2010

Sur la table's brownies

I've been eyeing the sur la table's baking book, titled the art and soul of baking, for a while and it's finally here. Many thanks to Vicky for shipping it all the way from US to Indonesia :) So far I've been enjoying the book very much and I find it very interesting because the book is not simply a collection of recipes but there's a lot of facts and tips about baking. I think this is a wonderful addition to my collection and it's super helpful for beginners like me.


After browsing the recipes, I decided to try a timeless recipe - brownies. This recipe produces the classic fudgy brownies and it's really simple to make. I have to admit, though this is not my favorite brownies recipe, it is a pretty good one :)

4oz unsalted butter
4oz bittersweet chocolate
2oz unsweetened chocolate
7oz granulated sugar
2 large eggs
1 1/2 tsp vanilla extract
2 1/2 oz all purpose flour
a pinch of salt
4oz chocolate chips (optional)
2oz chopped nuts (optional)

Preheat the oven to 350F and line an 8" square pan with parchment paper extending to the sides.

Bring water to a simmer. Place the butter and chocolates in a heatproof bowl and set it over the simmering water until the mixture is melted and smooth. Remove the mixture from the heat and whisk in the sugar. Then whisk in the eggs, one at a time. Add in the vanilla extract and then the flour and salt. Stir until the mixture turns from dull and broken looking to smooth and shiny. Whisk in the chocolate chips and nuts, if using.

Scrape the batter into the prepared pan and bake for 35 to 40 minutes (or until a skewer inserted into the brownies comes out with a few moist crumbs). Transfer to a rack and cool completely.

I cut my brownies into 16 squares and shared it with my friends and family :)

Mango Mousse Cups

I used to study in Singapore about 10 years ago and over there I met some really wonderful friends that I hope to keep for life. Aside from friends, I also met a few "sisters" who lived with me and my family while in Singapore. One of them is Beatrix. When I was in Singapore, she was still in grade school... now, she's a lady! She's attending med school and is doing great!

How is this connected to the mango mousse? Well, Beatrix wanted to make a mango mousse cake for her bf with me. In the course of the cake, we had leftover mousse. :) So to make use of every dollop of mango goodness, I spoon them into little cups, added some diced mango in the middle and made myself some mango mousse cups.


I don't have a fix recipe for this mousse, but here's what I use this time:

250g mango puree
75g granulated sugar (my mango puree was already sweet)
125g heavy cream
4 gelatin sheets

In a small pan, warm the mango puree and the sugar until all the sugar is dissolved. In the mean time, soak the gelatin leaves in cold water to soften it. Add the softened gelatin leaves to the puree and stir till dissolved. Leave the puree mixture to cool, as hot sauce will "destroy" the heavy cream. Whip the heavy cream till soft peak and then fold in the cooled mango puree. Viola!

It's that simple :)

Dice up some mangoes, put in the bottom of the cups and then spoon in the mousse. Top the mousse with some more diced mangoes as decor.

Enjoy!

Thursday, November 25, 2010

Cupcakes for Filemon's Prayer Warriors

It's been two months since I update this blog and I'm truly sorry for my tardiness. Despite my absence on this blog, I haven't been absent in my bakings. I have to admit though, I don't bake as often in Indonesia compared to when I was in Houston. Maybe it's the kitchen, maybe it's the ingredients, maybe it's my change of status (married!) - I can't put a finger on the cause yet. :p

Anyways, sometime in September the Filemon's Morning Prayer Team celebrated their birthday. I think it's their 12th or 13th birthday. For the event, I made some cupcakes for the souvenirs. :) The morning prayer team are a group of people who gather every morning at 5AM to pray. They are very dedicated and have such warm and loving hearts. It's really a joy to be in the midst of them.


These are just banana and chocolate cupcakes that we made at the last minutes. And so we didn't have time to take many pictures. :p But we hope that they enjoyed the small gifts that we make for them as a token of appreciation for the prayers that they have lifted up to date.

Wednesday, September 29, 2010

Cupcakes for Kebon Klapa's Ground Breaking

In conjunction with the ground breaking ceremony of the upcoming Kebon Klapa Restaurant at Jl Panjang, I made a few mini cupcakes as souvenirs for the guests who came. The restaurant is going to be a comfy garden restaurant that has both indoor and outdoor seating. The plan is for the restaurant to open for breakfast, lunch, tea time, and dinner with different types of food depending on the time of day.

The main attraction for the restaurant will be its massive garden with beautiful landscape, live music, and of course, AMAZING food. The food theme for the day will be Indonesian food and seafood for the night. They had a food testing session the other day and the Rojak Fish is to die for!! The black pepper crab and the oatmeal tiger prawns are just as amazing! Their homemade tofu is so smooth and silky. *Sllrrppp...*

I am really excited about this restaurant and I will definitely give another update for this restaurant's opening.


I made yellow butter cupcakes for these with vanilla IMBC. Thankfully the cupcakes were able to withstand Jakarta's heat and still taste yummy. Since the restaurant's show stoppers are mostly seafood, I had an Under the Sea theme for the cupcakes. There is, however, one off theme cupcake: the fried chicken cupcake! I added it just because I think it looks cute. :p


So if you are in Jakarta and you feel like ordering some cupcakes, give me a call! :p Or leave a comment...

Cheers!

Tuesday, September 28, 2010

Sexy Lingerie Cake

If it weren't for my sister, I wouldn't have made this cake. She was the one who pushed for me to take this cake order. Otherwise, I would never had made a sculpted cake. Thanks, De! :)

I also need to thank my friend Kim who was the first person to tell me to make erotic cakes. :p Although this cake is mild, it's the start of an idea that Kim had told me. Thanks, Kim! :)

Even though I really enjoy baking and making creations in my kitchen, I don't really have the creativity to decorate my cakes. But with the help of Alvin, I managed to pull this one through. Thanks, babe! :)


This cake has a story of its own too. My sister told me that her friend's getting married and they're throwing a bachelorette party for her. They wanted to have a lingerie cake for the event and so I made this cake. However, I made a white velvet cake with vanilla buttercream - not knowing that the bride-to-be is more of a chocolate person.

Once again, because I don't really have confidence in the cake I had made complementary banana cupcakes to accompany the cake. I covered it with fondant and decorated it with hearts. :) After all the cake and banana cupcakes were ready to go, I called my sister to pick them up.


My sister then asked, "Ci, these are chocolate cakes right?"

I said, "No... the cake is vanilla and the cupcakes are bananas"

She said, "Err... but my friend likes chocolate cake"

And there I am without anything chocolatey for the bride-to-be. So I rushed to make these chocolate cupcakes to further complement the cake and the banana cupcakes. LOL


Although I had to work a LOT for this cake, I was glad that the cake actually looked like a lingerie and both cupcakes were well-received. :)

Tuesday, August 31, 2010

It's a Boy!

This one is long overdue :p I've had the draft of the blog entry done in August, but it's only now that I have time to finish writing it up and posted it up. For those of you who's been wondering about my being MIA, I apologize for the long absence but I really don't have anything to blame. Working and adjusting as a wife plus the slow Internet connection here in Indo makes it harder for me to update blog often.

Anyways, about the cakes and cupcakes...

This is my first fondant cake order in Indonesia and I am very happy with how it turned out although the process was a little chaotic. The story begins with Quincy asking me if I would be able to make a baby shower cake for her cousin's wife. I was so excited that she asked me and it was such an honor because I don't have much experience with fondant cakes and yet for this special occasion, she gave me a chance to challenge myself. :) Thanks, Quin!

The cake that you see in this blog post is actually the second cake that I made for the event. The first cake "melted" under the hot Jakarta weather before it had a chance to make it to the event. See, I made a blueberry cream cheese cake for this event that requires refrigeration. This is a big NO in Jakarta because of several reasons:

1. Fondant cakes cannot be refrigerated
2. If you think that putting the cake in an air conditioned room will work, it won't - it was my experience with this cake

The cake was supposed to be picked up at 9AM Sunday morning and I discovered the disaster at 9PM Saturday night. So I hurriedly baked another cake and buttercream that doesn't require refrigeration. While waiting for the cake to cool, I rushed to re-make all the fondant decorations. By 2AM, the new cake was done :) Yay!! Praise the Lord!!


The cupcakes were for bonus. I was worried that the buttercream cake won't suit their taste, so I made some cupcakes as complements. Plus, I got addicted making the baby's face :p

I hope that there will be more cake orders coming my way :) And perhaps... I can bake often once more

Wednesday, July 28, 2010

Cheese Chiffon Cupcakes

July seems to be a wonderful month for me as evidenced by the number of things I've managed to bake compared to the previous months I've been in Indonesia. :) I hope that going forward, I'll be able to resume the same (or even faster) pace in baking at home here in Indonesia as in Houston. You'll also start to notice a lot of this dotted gray table tops on the pictures of my cakes and breads :p It's my new kitchen counter! Yay!

One of the advantages to baking in Indonesia is the abundance of Kraft Processed Cheddar Cheese that was so difficult to find in Houston. In every grocery store that you go to here in Indonesia, you can be sure to find this Kraft cheese. Almost every child in Indonesia grow up with this cheese and so the taste is very comforting to many people here. I'm no exception. :)


These cupcakes here are made with the same batter as my chiffon cake but baked in cupcake pans lined with paper liners. I filled each pan with batter almost to the top - this is because when baked in cupcake pans, I wasn't able to "hang" the cake up and therefore the cake's dome will flatten as it cools. Once baked and cooled, I frosted the top with a little buttercream and generously topped them with Kraft cheese.

I brought these to the office and it was quite a hit! :)

Birthday Bake Off!

I've reached the age of 26 this year and I'm happy to say that this is also my first birthday as a wife. :) Not only did I get the awesome gift of a new household, I got some other SUPER AWESOMe gifts from my family: Fizzler's Magimix Food Processor and Bosch's Mixer (the mixer I told you about here). Thank you sooooooo much to my family! You guys are the best!

God has truly been good in my life. He's provided all my needs and given me such loving husband, family, and friends in life. What better way to celebrate than bake? <3

My dad's so gracious to have given me the day off to indulge in baking. :)

In the dessert menu:

- fondant covered chocolate cupcakes
- eclairs
- banana cupcakes
- tiramisu

All of my favorite items are in :)


Itadakimasssss :)

Out of This World Brownies

Someone told me once that brownies is one of the easiest thing one can bake at home. It doesn't require you to use any special equipment, not even a mixer (handheld or stand). However I've yet to find a brownies recipe that's perfect for my taste. I like my brownies be balanced between cakey and fudgy, I like my brownies to have a deep chocolatey taste that is not overwhelmingly sweet, and I like my brownies to have a thin crunchy crust. Well this one covers all my check points. :) Warning though, this one does need a mixer :p


Out of This World Brownies
adapted from Sherry Yard

3/4 cup + 2 tbs all purpose flour
1/4 tsp salt
4oz butter, chopped
1oz unsweetened chocolate
7oz bittersweet chocolate
2 large eggs
1 cup sugar

Preheat the oven to 350F and line an 8" square baking pan with aluminium foil sprayed with pan spray (ex. PAM). Sift the flour and salt together. Melt the butter, unsweetened chocolate, and bittersweet chocolate in a microwave safe bowl at 50% power for about 2 minutes or in a heat proof bowl set over a pan of simmering water. Allow the chocolate mixture to cool to about 90F.

In a large bowl, beat together the effs and sugar until fluffy using a mixer. Then, gently beat in the butter and chocolate using a whisk. Last, fold in the flour mixture. Scrape the batter into the prepared pan and bake for about 25-30 minutes. Allow to cool to room temperature before serving.

This is a recipe that's definitely worth trying :) Enjoy!

Back to Bread

You probably think that I've posted enough breads already and you're probably bored of all these postings of the same things over and over again. But I just have to share this one with you. :)

It was one of those weekends that we spent at my parent's villa in Puncak (puncak = mountains). My family often goes there to relax and escape the madness of Jakarta. However, this specific weekend was a bit more special than usual. Filemon's youth group were having their annual retreat at the villa. There were 60+ youth members that attended and they're hungry all the time. :p So as soon as I arrived in Puncak, I was asked to bake some snacks for them - more specifically, I was asked to bake some breads for them. Awesome!!!

I made about 70 breads that day with my mom's bosch mixer (which is waaayyy more awesome than my KA when it comes to kneading bread dough). Mom's bosch can take about 1 kg of flour when my KA can only take about 250g of flour at one go. It's amazing! I used the same recipe as before but the breads were much better than any I've ever made at home - maybe it's my happy mood, maybe it's bosch, or maybe it's puncak - I haven't been able to decide which. :p
I made these with all my heart and I hope that all those 60+ youth also ate it with their hearts :p It is such a joy to be able to make breads that peeps enjoyed. It's such an experience for me to make so many breads at one time. It's.... *speechless*


Thursday, July 8, 2010

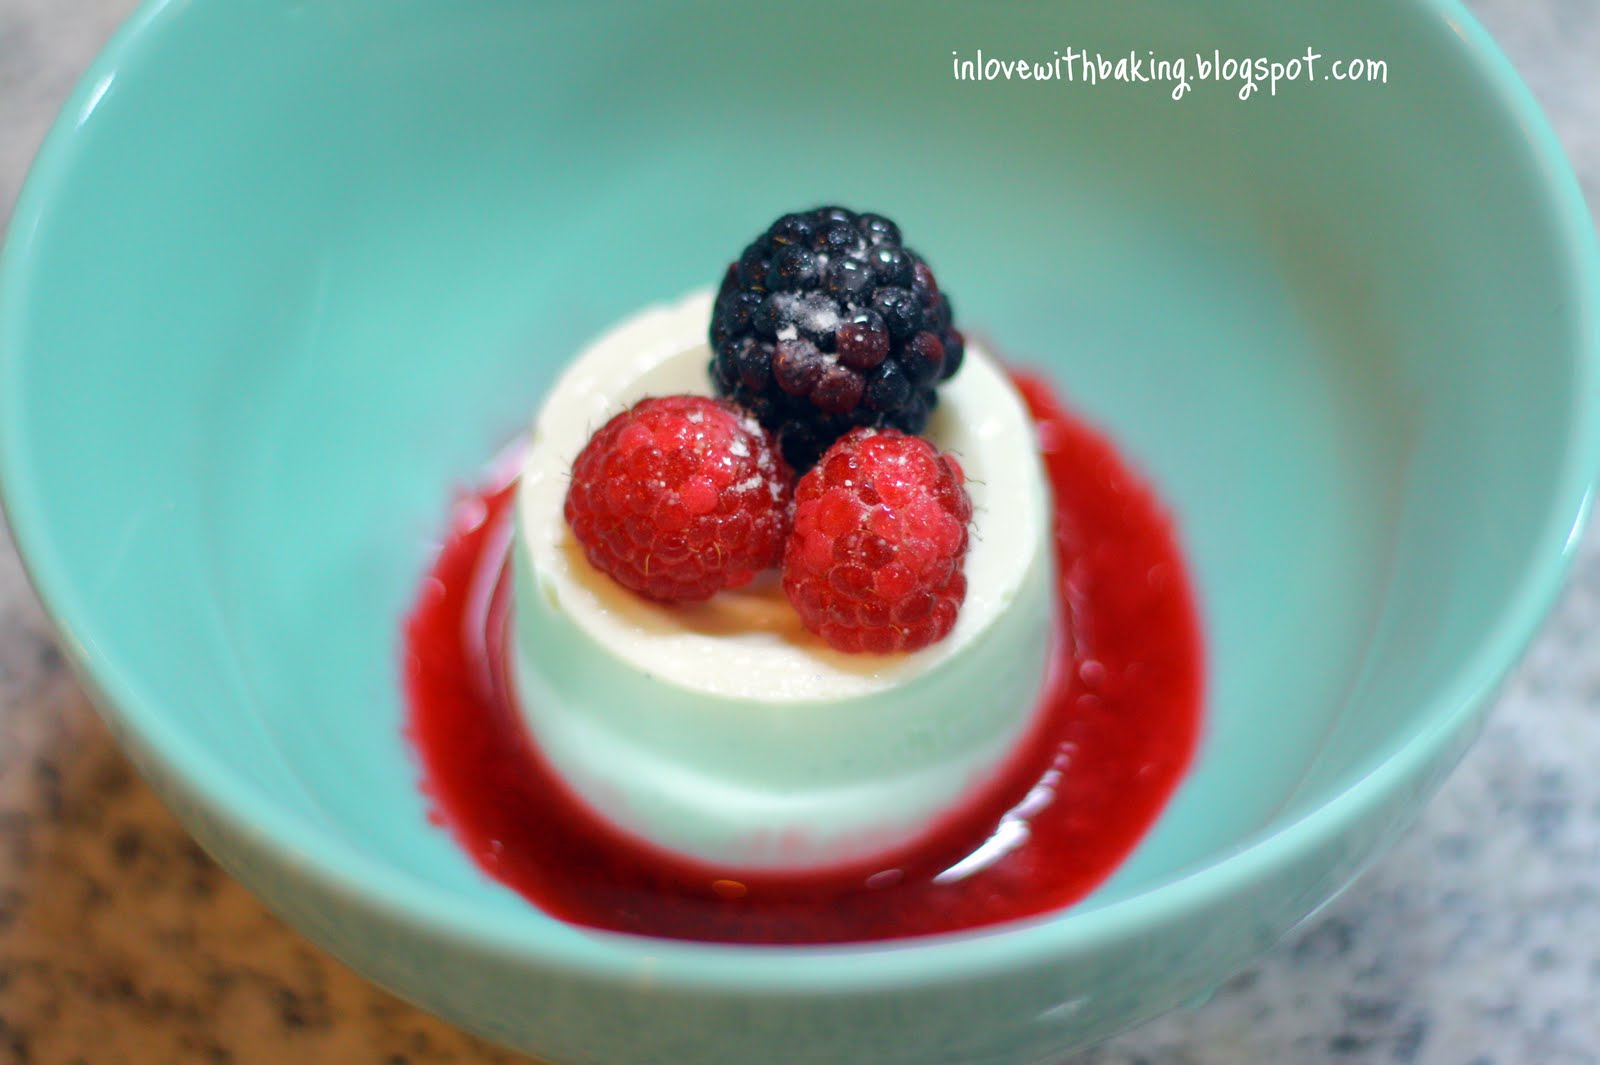
Panna Cotta

I've heard of panna cotta since a while ago but I didn't really pay attention enough to try experimenting with it in my kitchen. But after reviewing the contents of my fridge, I realize that I have leftover plain youghurt and then I start looking around for desserts that use yoghurt. This panna cotta recipe came to mind - one simple recipe that has been tested and tried by a dear friend that I respect and trusted. If she's used the recipe and published it, it means that this is some good stuff :p


She used this recipe to make verine, but I just want to try the panna cotta portion of the recipe.

Panna Cotta by Bertha

200g heavy cream
45g granulated sugar
1/2 vanilla bean, split and seeded
3/4 tsp gelatin powder
1 tbs water
100g plain yoghurt

Combine the heavy cream, sugar, and vanilla bean in a saucepan and bring it to a simmer. Bloom the gelatin in the water and melt it in the microwave for about 10 seconds. Once the cream mixture come to a simmer, add in the melted gelatin. Cool the mixture in an ice bath. Once it reaches room temperature, mix in the yoghurt. Pour into the prepared moulds and chill in the refrigerator until set.

When I serve my panna cotta, I poured some raspberry sauce around and topped it with some mixed berries. Yumm!!

Wednesday, July 7, 2010

Soft Bread

I'm very thankful for all the support and encouragement that my friends and family have given me to continue doing what I love to do - baking. :) So before I start blabbering about bread, I wanna say thanks to all of you XOXO

Lately I've been quite obsessed with breads, soft bread specifically. I've learnt that the American/European type breads are very different than Asian breads. In Asia, or Indonesia at the least, soft breads are the way to go. A good bread is one that is ultra soft, very light to the bite, and stay that way even after a few days. Some of the very famous bread stores in here are Bread Life, Bread Talk, Pinot Kids, and Shokupan. Most of these bakeries are Japanese bakeries that use special flours from Japan. :) I guess the Japanese have a way with breads. :p

I don't have flours from Japan and I don't know how to make awesome breads like the Japanese, but I have found a recipe for a bread that I really like. It's real soft and it last for days :) I've posted a recipe for a soft bread before but I've made some minor modifications to make the bread more towards my taste buds :p With this basic bread dough recipes, you can make many different kinds of breads: chocolate bread, cheese bread, milk bread, etc.

So here goes the recipe:

250g high protein flour
70g granulated sugar
6g instant yeast
10g milk powder
2 egg yolks
150ml evaporated milk
50g margarine
A pinch of salt
Additional evaporated milk for brushing the bread's top

In a mixer fitted with a dough hook, mix together the flour, sugar, yeast, milk powder, and egg yolks. As the dough hook turns, slowly pour in the evaporated milk. Continue kneading until all the ingredients are mixed in well into one sticky dough. Add in the salt and margarine and continue kneading until the dough is smooth and elastic (about 30 minutes for me).

Proof the bread in a bowl brushed with margarine and covered with plastic wrap for 30 minutes or until the dough has doubled (or tripled). Then punch the air out of the dough, divide into portions of about 50g each, and proof for a second time for 15 minutes. When the dough has relaxed, fill the bread with whatever filling that you like, and then proof for another 25 minutes until the dough has doubled in size. Brush the top with evaporated milk and then bake for 15 minutes at 350F.

I hope you enjoy the recipe and experiment with the fillings :) I really can't wait to make more breads when I have the chance.