Sunday, June 28, 2009

Blueberry Muffins

I just got back from a 2 day 1 night trip from Vegas for Alvin's cousin's wedding (which was a lot of fun!) and got a chance to meet adorable little Jeff (Alvin's nephew in SF) one more time! :)

Before I write about the muffins, I've got to gush about this little boy for a bit. He is THE happiest baby I've ever met! He wasn't afraid of strangers and was comfortable playing with us from the first time we met on this trip. He loves to dance to hip hop music and his eyes twinkle a lot when he laughs. He got super excited over bananas and was just very easy to feed. He would walk/run, stumbled, and fell a little, but he would stand right back up with a smile on his face. Simply said, I fell in love with this little boy! :) I can't wait till we get to see him again.

(breathe in... breathe out...)

Okay... now about the muffins:


It started at H-E-B when blueberries were on sale for $1.50/pint and I immediately thought of making a blueberry dessert. :) I'm not as big a fan of blueberry as I am a fan of raspberry but since I've never really given this berry much of a chance to shine in my kitchen, I thought that I should open up some doors for these round purple thingies. :p SO I browsed through all my baking books in search for blueberry recipes and there were several that caught my eyes: blueberry crumble coffee cake, blueberry plain cake, blueberry ginger muffins, and good 'ol simple blueberry muffin. And as you may have guessed, I stick to the basic and therefore chose this simple blueberry muffins as a start. :)

I used the recipe from Baking at Home with the Culinary Institute of America and I really liked how the muffins turned out. The texture was really tender and the crumbs were really small and moist. My only regret was not filling in the muffin cups with enough batter and therefore did not achieve the little domes that muffins typically have. Anyways... here's the recipe:

2 cups + 2 tbs all purpose flour
1 1/2 tsp baking powder
1/2 tsp salt
1/4 tsp ground nutmeg
3/4 cup milk
1 large egg
1/2 tsp vanilla extract
8 tbs unsalted butter
1 cup sugar
1 1/2 cups fresh blueberries
Preheat the oven to 400F and line the muffin pan with paper liners. Sift 2 cups of flour, baking powder, and salt together into a bowl and set aside.

In a separate bowl, blend the milk, egg, and vanilla extract.

In a mixer fitted with paddle attachment, cream the butter and sugar together until light and smooth in texture (about 3-4 minutes). Add the flour mixture in 3 additions, alternating it with the milk mixture, mixing at low speed until all the ingredients are blended together. Increase the speed to medium and mix until the batter is very smooth (about 2 minutes).

In a bowl, scatter the 2 tbs of flour over the berries and toss to coat them evenly. Using a spatula, fold the berries into the batter, working just long enough to distribute the berries evenly.

Divide the batter evenly among the muffin pans and bake until the top of the muffins spring back when lightly pressed (about 18-20 minutes).

Let the muffins cool in the pan for about 5 minutes and remove it from the pan to finish the cooling process.

They're now ready to be consumed! I hope y'all enjoyed the muffins as much as I do. :)

Friday, June 26, 2009

Mini Mango No-Bake Cheesecake

I had a really fun experience last night with cheesecake. Well, the experience actually started the day before yesterday but the time of event depends on the grand finale, in my opinion. :p

Carrie and Jim are getting married soon and they had asked me if it would be possible to have mini cheesecakes for after dinner dessert on the wedding day. I had never made mini cheesecakes before and so before I said yes to the major task, I had asked them to come for a taste test. :) They wanted about four different flavors of cheesecakes, bite size. I had a lot of thoughts about these and asked many people's opinions on the different flavors. I finally settled on mango, white chocolate blackberry, dark chocolate, and plain vanilla.

I started the process on Wednesday and finished everything on Thursday night. I really had lots of fun with the baking process. I managed to decorate each cheesecake pieces to the best of my abilities and then forgot to take pictures of them all! >_< And I realized this after I had given all the left-over cheesecakes away to everyone.

Thankfully there are some faithful mango cheesecakes left. So Alvin and I were able to take some pictures to share. :)


Again, we were playing around with our Canon. We still have some difficulties with focus and lighting, but I believe that we will learn with time. :)

Sunday, June 21, 2009

Brown Velvet Cupcake with Cream Cheese Mascarpone Cream

I haven't been making cupcakes in a while, it seems. In fact, I feel that I haven't been baking as much this month. I wonder why. I hope that this is not some kind of indication that baking is just another fleeting hobby that I happen to catch for a little moment.

Just to share a little about me: I have a lot of dreams and I have a lot of interests. However, I am also easily entertained and easily bored. I tend to start many things but I don't always finish what I start. I'm trying to be a better person in Christ and I am aware that I am a work-in-progress in God's hands. I've been questioning on what it is that God wants me to do in life with all the interests and passion that He had placed in my life but I have yet to find a conclusive answer.

I know that God placed the love of baking in me for a reason. Just like He placed the love of children in me. I'm just not sure on how He's going to use me for His glory.

Anyways... moving on to the cupcakes. :)

I think I've said this before, but I've always been curious about the red velvet cake. I've made it once before but I wasn't completely satisfied with the results. The color was not red enough and the frosting did not have enough "emph" (whatever that means to you :p). I was also rather disappointed to find out that much of the color in red velvet cake actually comes from food coloring. Traditionally, the red color in the cake was produced by a chemical reaction of the baking soda, vinegar, and cocoa powder. But this reaction alone does not yield a red-enough color for the cake. Therefore, many people used food coloring to "help" the process.

When I saw the red velvet cupcake recipe from Joy of Baking, I became really curious and interested to try. So when I had the opportunity to put this recipe to the test, I did! One little tweak I made to the recipe was to omit the red food coloring. Whenever I can, I try to cut back on the amount of chemicals in the cake. So instead of a red velvet cupcake, I made a brown velvet cupcake. :)

One comment that I got on these is that the frosting is REALLY good! Everyone who tried it, loved the frosting. I loved it too! I personally think that anything with mascarpone is good. :)


Another current hobby and past time for Alvin and I is photography - well, it's more of fun picture taking. We both have a lot of fun with out Canon and since Alvin just bought this new prime lens, I just had to show off the results. :p LOL

I know... I know... we are so far off from being perfect or even artistic. Hahaha... but nonetheless, we had fun taking these pictures. I hope you guys enjoyed it too!

For anyone out there who are good at photography and would love to share some tips for us, we will greatly appreciate it too! :)

Basketball Shortbread Cookies

This is the 3rd time I've tried making cut-out cookies with royal icing. The first was for fun as a practice run for Eva's bridal shower cookies. The second was with Cess - and she can attest that it was not as fun as we thought it would be. The third, which is these cookies here, was actually not bad at all. :)

I made these for Ko Yohan's birthday gift. I usually like to bake birthday cakes for my friends' birthday as a birthday gift, but Ko Yohan had mentioned that he didn't want any cakes. So I thought of another baked goodies to make as a gift. :) You see, whenever Ko Yohan and Alvin met, they always talked about basketball. And Ci Lia also mentioned that he spent a lot of times watching NBA games. So I thought that these basketball cookies would be a good gift for him.

I used the shortbread cookies recipe from Joy of Baking and I really liked how it turned out. The cookies don't taste too sweet and it crumbles in your mouth when you bite into it. I would definitely stick to this recipe going forwards. :)

As for cookie decorating, I'm still new to it and definitely have a LOT of room for improvements. Next time, I'll be more patient when decorating - to make neater outlines and patterns. And I will also learn to use a smaller tip for piping patterns to make more intricate designs. :)

Tuesday, June 16, 2009

"Surprise Me" Cake

Last week, before I went for my one-week training in Dallas, Suha asked me to make a cake for him. He didn't give any specifications on the kind of cake that he wanted but he only said "surprise me!" So I turned the wheels in my head, trying to come up with a cake that will really surprise him. When I made the cake, I had no clue as to whom the cake is for... is it for a boy or a girl? is it for 5 or 20 people? does he want fondant or no fondant? I was very confused. Thankfully, after I returned from training I had the chance to meet and asked Suha these questions. :p

It turned out that the cake was for a birthday boy and it'll be consumed by quite a few people. So Suha decided that he wanted a 10-12" fondant cake.


The cake itself is made of 3 layers of vanilla sponge cake filled with orange-infused buttercream and lots of jackfruit. I've never made nor tried this flavor combo before but I'm pretty sure many will be surprised. LOL. :p It was very difficult for me to decide on the kind of cake to make because there are too many possibilities!


I also had a hard time deciding on the cake design. You see, I'm not a very creative person and over the past fondant experiences, I realized that I may not been very good at it. One of the biggest challenge for me in working with fondant is covering the cake with it. It seemed like a simple step and one of the basics of using fondant. But somehow, I'm not very good at it. It's always such a challenge to have a smooth cake. This has been a particular challenge since I started using Satin Ice fondant.

But something was different when I covered this cake with fondant. I remembered my mom's words: "If your heart's not in the right mood, you can't make a good cake." So I calmed my anxious heart down and I felt relaxed and at peace. I started weighing the fondant, then rolling it out, and lay it on the cake - and everything went very smoothly. I didn't have any cracked sides and the caked looked alright. :) Thanks, Mom!


After passing the most difficult stage of the fondant process, I played around with some decoration ideas. I know the cake is for a boy and so flowers, pink stuff, and hearts are out the door. Since this is a gift, I decided to make the bow and some contemporary polka-dots. I choose the ivory and dark brown color combination for the cake because I believe that they really compliment each other. I think that the cake looked simple and rather elegant. What do you think?

This cake will be picked up later tonight, so we'll see how the taste test went! :)

Coffee Break Muffins

Lately, I've been in the mood of muffins. They are very simple and easy to make. You don't need mixers and you don't need measuring scale (for this one, at least). All you need - as far as hardware goes - are 2 mixing bowls, muffin pans, and muffin liners. :)


This coffee muffin was made using a recipe from Baking - From My Home to Yours by Dorie Greenspan. I receive this book as a birthday gift from Ci Lia, Ko Yohan, and Ethan. :) It's one of my favorite baking book of all time! There isn't a recipe in this book that I tried and didn't like.

Dry ingredients:
2 cups all purpose flour
1/3 cup granulated sugar
1/3 cup packed light brown sugar
1 tbs baking powder
1/2 tsp cinnamon
1 tbs espresso powder

Wet ingredients:
1 cup strong brewed coffee, cooled
1/2 cup melted butter, cooled
1 tsp vanilla extract
1 egg

Making muffins is basically a 4 step process:
1. Mix in all the dry ingredients in a bowl
2. Mix in all the wet ingredients in a bowl
3. Mix the dry and wet together - don't over mix the batter, it should still be lumpy
4. Pour the batter in the muffin cups and bake at 375F for 20 minutes


I really like how this muffin turned out, especially when it's still warm. :) The top part of the muffin is crispy and the inside is soft and moist. Alvin and I ate it again when it's at room temperature and they're still pretty good. I highly recommend this recipe to those who are looking for something simple to make in the morning. :)

As I was making this cake, I had this thought that I would love to be making breakfast goodies for my future husband. :p It's funny how Alvin and I learned to cherish each other more these few days - especially after the stolen purse incident. It gives me a warm feeling in my heart. :) It also reminded me of how much Jesus loves me - I may not be able to make him breakfast muffins everyday, but I am learning to give Him my time in the morning (and throughout the day). I wish that everyone can share this warm feeling as well.

Love,

Friday, June 12, 2009

Chocolate Chip Cookies - the chewy kind

Wow! This month sure pass by pretty quickly. Many things happened this month: my purse was stolen, I went for a rushed inventory, I went for a week-long training, I learned to two-step, and I had a fun photo session with Ci Lia. :) In the midst of all these, I still had some time to bake little goodies here and there. I haven't been very good at updating my blog lately but I promise that I'll try harder in the future.


Last week, I had the opportunity to work with a new team that are filled with fun and energetic people. I had lots of fun with them and really enjoyed the working environment. So I decided to bake something nice for them. When I asked them on what they want me to bake for them, one of them voiced out "chocolate chip cookies." :) I don't make cookies very often and I've never been really successful in making the chewy kind of cookies - so I was a little anxious when I baked this batch.

I had read in Professional Pastry Chef, that there are 2 main factors that contributed to chewy cookies:

1. the development of gluten (i.e. use of bread flour is preferred than all purpose flour)
2. under baking of the cookies (i.e. don't let them dry out in the oven)

So, I took these 2 points and took them for a test run. :)


I don't have the recipe of the top of my head (and I don't have the book right in front of me) , but if you are interested, let me know and I'll post it. :)

I really like how the cookies turned out. I had baked it at 375F for 10 minutes. The cookies are slightly browned at the edges and very soft in the center. And even when the cookies are cool, they are still very soft and chewy. :) Yay! Mission accomplished. :)


These pictures are courtesy of Alvin. :) He is really getting good at using our SLR, don't you think?

Wednesday, June 3, 2009

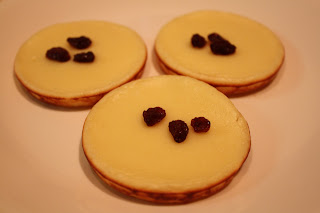
Kue Lumpur

Lately I've been in the mood of Indonesian dessert. Perhaps it's because my mom had been making me some yummy Ronde and Martabak Manis. I really miss those yummy after dinner snacks that reminded me of home. Or maybe it's because I had just gotten a birthday present from Tante Helen - a cast iron pan with 7 mini round molds! Thanks, Tante Helen! :) So I browsed through one of my favorite website for Indonesian food, Resep Nugraha, and found this recipe for kue lumpur.

I had never actually tasted a kue lumpur before, so I don't really know if what I made is what it should be. :p But when I brought it to my girls' bible study, they all liked it.

I also found, in my research of recipes for kue lumpur, that there are several different ways of making it. Some recipes require the use of potatoes, and some use fermented cassava, and others use only coconut milk. This one that I made only uses coconut milk for the batter. It's really simple to make and it taste good. :)

Oh! I forgot to share this with you guys... for my dad's 50th birthday, he received 2 nice DSLRs from his friends - a Nikkon D90 and a Canon 450. So in his awesome kindness, we were given the Canon one to play with. :) Alvin and I really enjoyed our new toy! Thanks, Dad!